Showing posts with label Chocolate. Show all posts

August 8, 2010

Crispy Salted Oatmeal White Chocolate Cookies


These cookies fit perfectly with the sweet and salty trend making its way through grocery stores (tried those yummy Nature Valley granola bars?), restaurants (we've heard of chocolate bacon), and blogs (these cookies!). We adapted a recipe found on PickyCook, a well-organized blog with a huge range of culinary ideas.

Crispy Salted Oatmeal White Chocolate Cookies
(the name is quite a mouthful...)
1 cup all-purpose flour
3/4 teaspoon baking powder
1/2 teaspoon baking soda
1/2 teaspoon salt
14 tablespoons butter, softened but still cool --> this works out to about 3/4 cup + 1/8 cup
1 cup granulated sugar
1/4 cup brown sugar, packed
1 egg
1 1/2 teaspoons vanilla extract (we put in about 2 teaspoons)
2 1/2 cups old-fashioned rolled oats --> do not use instant or quick-cooking oatmeal!
1 cup white chocolate chips
Flaky sea salt
  • Stir together flour, baking powder, baking soda, and salt in a small bowl.
  • In a large bowl, beat butter and sugars for about 20 seconds. Increase mixer speed and beat for a minute longer, until light and fluffy. Scrape down the sides of the bowl before adding egg and vanilla to the mixture. Beat until well-combined. Scrape the sides of the bowl again.
  • Add flour mixture into the large bowl, mixing on low speed until just combined. Slowly add oats and mix well.
  • Add white chocolate. We found it easiest to stir with a wooden spoon, but you can mix for a few seconds if you would like.
  • Form dough into balls between 1 and 2 tablespoons each.
  • Line baking sheets with parchment paper or silpat... We'd used our silpat (ours is Patisse brand) mat to roll out cookies on the counter before, but we had no idea it could go in the oven. Very cool! And the cookies really don't stick.
  • Place cookies on baking sheets, leaving an inch or two between each one so they have room to spread.
  • Use your hand to flatten the dough balls so they are 3/4-inch thick. Sprinkle with sea salt.
  • Bake in preheated 350 F oven until cookies are golden brown and edges are starting to crisp - 13 - 16 minutes. We let ours bake for 15 minutes, which left the centers a bit chewy. Let the cookies cool a little bit before transferring to a wire rack.
Combining the wet and dry ingredients.

The original recipe called for a chopped-up white chocolate bar.
Chocolate chips are a little bit easier, but we're sure the chocolate
bar would be decadent!

Dough is done, pan is prepared, oven is on.

Sprinkling the salt.


August 4, 2010

Chocolate Caramel Thumbprints

Lisa has been itching to make these for ages. They're out of one of our favorite cookbooks, Better Homes and Gardens: The Ultimate Cookie Book (edited by Lois White, 2007) and can also be found online. You should see our copy of the cookbook: there are purple post-it notes sticking out all over the place, marking recipes we just have to try!

These cookies are chockfull of pecans, so take this into account when sharing with others. We don't recommend omitting the nuts though, because they help to hold the cookie together.

Chocolate Caramel Thumbprints
1 egg
1/2 cup butter, softened
2/3 cup sugar
2 tablespoons milk
1 teaspoon vanilla
1 cup all-purpose flour
1/3 cup unsweetened cocoa powder
1/4 teaspoon salt
16 vanilla caramels (we used regular caramels)
3 tablespoons whipping cream
1 1/4 cups finely chopped pecans
1/2 cup semisweet chocolate chips
1 teaspoon shortening
  • In a large mixing bowl, beat butter for 30 seconds. Add sugar and beat well. Then add egg yolk, milk, and vanilla (make sure to put the egg white in the fridge, because you won't need to use it for about 2 hours).
  • Stir together dry ingredients (flour, cocoa powder, and salt) in a small bowl. Add to butter mixture and beat until well combined. Wrap in plastic wrap and chill for 2 hours.
  • Preheat oven to 350 F. The original recipe says to lightly grease a cookie sheet, but we didn't bother.
  • In a small pot, melt caramels with whipping cream over low heat. Stir (milk burns quickly) until mixture is smooth. Set the pot aside.
  • Slightly beat egg white. Shape the dough into 1-inch balls. Roll the balls in egg white, and then in pecans. The egg white will make the pecans stick.
  • Place the balls of dough an inch or two apart (they spread!) on the cookie sheet. Use your thumb to make a dent on the top of each cookie.
  • Bake at 350 F for 10 minutes or until edges are firm. If the center indents disappeared while baking, redo them with your thumb (or a spoon if the cookie is hot). Spoon melted caramel mixture into the dents. Transfer cookies to wire racks to cool.
  • Drizzle with melted chocolate if you want to up the decadence factor. Enjoy!
Egg and vanilla added to the batter.

Pecans!

The caramel really spreads!
Store these in the fridge to keep the cookies from sticking together.

Creamsicle Cookies


We're all about the summertime flavors right now, if you haven't noticed. Remember running around as a kid with a sticky popsicle mess dripping down your hand? Maybe you ran through the sprinkler afterwards to rinse off. Or maybe it wasn't a popsicle. Maybe you were lucky enough to have a box of ice cream filled orange popsicles (creamsicles!) in your freezer...

This recipe comes from Baked Perfection, a blog with a ton of great tags, which makes it easy to search by ingredient or flavor. Apparently they were originally called "Orangebursts", but we like the frozen treat inspired name better.

Creamsicle Cookies
2 1/2 cups all purpose flour
3/4 teaspoon baking soda
1/2 teaspoon salt
1 cup butter, softened
1/2 cup sugar
1/2 cup brown sugar
1 egg
1 teaspoon vanilla extract
2 tablespoons orange zest (we put a tiny bit more in)
2 cups vanilla chips (we used white chocolate chips)
  • Mix together butter and sugars (make sure to firmly pack the brown sugar) until light and creamy. Beat in egg and vanilla.
  • In a separate bowl, stir together flour, baking soda, and salt. Gradually add this mixture to the butter and sugar bowl, mixing on low speed until just combined.
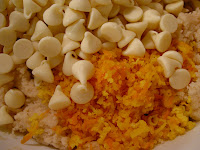
  • Stir in orange zest and chips (vanilla, white chocolate - whatever you decide!).
  • Drop rounded teaspoonfuls onto ungreased cookie sheets. They spread a little bit, so make sure to leave some room.
  • Bake in preheated 375 F oven for 8 - 10 minutes, or until light golden brown around the edges. Remove from oven but let cool on the cookie sheets for a few minutes (they'll continue to cook for a minute or two). Transfer to a wire rack to cool completely.
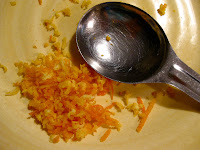
Check out the mini grater!

The orange will add a surprisingly strong flavor burst...
we did add a little extra.

Mixing things up...

If you can find vanilla chips, please let us know how they are!
We used plain white chocolate chips and the end result was still delicious.

Lisa hard at work.

June 20, 2010

Mocha Cutouts... Oh Canada!


Time for a little patriotism!
These would have been perfect for Olympic celebrations... so we fed them to athletes you just might see competing at London 2012 or Rio 2016!

Quite early in the morning on a sunny Thursday in May, Amy filmed a profile piece of Lisa's swimming team... As a thank you to the girls and coaches for their patience, hard work, enthusiasm, and sense of fun, we made cookies for after the practice. After an early morning workout, the hint of coffee flavor was a nice wake-up boost.

This recipe is slightly adapted from Better Homes and Gardens: The Ultimate Cookie Book (edited by Lois White, 2007).

Mocha Cutouts
Makes 18 - 24 cookies
1/2 cup butter or margarine, softened
1/2 cup packed brown sugar
2 teaspoons instant coffee powder
2 teaspoons cocoa powder
1/8 teaspoon salt
1 egg yolk
1 tablespoon strong coffee
1 1/2 cups all-purpose flour
3/4 cup semisweet chocolate chips
1 tablespoon shortening
  • Baking for adults? Try spiking these cookies! Instead of the tablespoon of strong coffee, add 1 tablespoon of Baileys Irish Cream or a coffee flavored liqueur.
  • In a medium-sized mixing bowl, beat butter for 30 seconds on medium to high speed. Mix in brown sugar, coffee powder, cocoa, and salt. Beat in egg yolk and coffee.
  • Gradually mix in flour. The dough will get very thick - use a spoon to stir in flour, if necessary.
  • Divide dough in half. If you need to, cover and chill until easy to handle.
  • Roll out one half of the dough at a time, to a 1/4 inch thickness. Use cookie cutters to shape cookies. Place cookies on un-greased baking sheet.
  • Bake in preheated 350 F oven for 12 minutes or until set. Remove from over and let cookies stand for a minute on the sheets before transferring to a wire rack to cool.
  • In small pot, melt together chocolate chips and shortening over medium-low heat. Stir until smooth. At this point you might want to put waxed paper under the wire racks to save on clean-up time.
  • Dip cooled cookies into chocolate mixture. Let stand until chocolate sets.

Leave about an inch between cookies, just in case they spread.

A pile of leaves!

A perfect coffee cookie.

June 6, 2010

Orange Chocolate Chip Shortbread


The flavor burst of one of those smashable throwable dropable chocolate oranges (you know the ones we mean?), packed into a melt-in-your-mouth shortbread cookie. Mmhmm... that's what this is.

The recipe for these citrus twisted cookies comes from Better Homes and Gardens: The Ultimate Cookie Book (edited by Lois White, 2007).
The original recipe calls for raspberry chocolate chips, which would be quite the flavor combination. We didn't have any on hand, but we'll be sure to try that next time.

Orange and (Raspberry?) Chocolate Chip Shortbread
Makes 24 cookies.
1 cup butter, softened
1/2 cup sugar
2 teaspoons finely shredded orange peel
2 1/4 cups all purpose flour
3/4 cup chocolate chips
Orange glaze (recipe follows)
  • In medium mixing bowl, beat butter on medium speed for 30 seconds. Beat in sugar and orange peel, until completely combined. Beat in flour until crumbly.
  • Stir in chocolate chips, pressing the dough together until smooth. If the dough is just too crumbly to pat together, try putting it in the fridge for a few minutes.
  • Pat dough into a rectangle (about 1/4 inch thick) on an ungreased cookie sheet.
  • Bake for 25 - 30 minutes in an oven preheated to 325 F. Bake until bottom is just beginning to brown and the centre of the cookie is set.
  • Place cookie sheet on wire rack to cool.
  • Spread glaze over cooled shortbread. Let the glaze stand for about 30 minutes, until set. Cut lengthwise, then crosswise, making 24 rectangles.

Chocolate chips and crumbly batter.

The consistency threw us off at first.
Add a tiny, tiny bit of milk if it's just too crumbly.

Press the dough together into a giant cookie!

Orange Glaze
1/2 cup powdered sugar
1 tablespoon butter, softened
1 tablespoon orange juice
  • Stir together powdered sugar, butter, and orange juice.
  • If necessary, stir in extra juice, one teaspoon at a time, until desired consistency is reached.
Once the glaze sets, cut into rectangles.

April 25, 2010

Irish Cream Truffle Fudge

Another bake-off at work! These days are awesome - the afternoon is spent wandering into the boardroom, sampling the treats, trying to figure out who baked what, and voting. Finally, after there is no doubt that everyone in the building is on quite the sugar high, the results are e-mailed.

The winner of last month's competition got to choose the theme for April: alcohol. What a tough one! We scoured the internet for ideas, and once again AllRecipes saved the day. From the kitchen of "LETSGGGO" comes Irish Cream Truffle Fudge. We made a few adjustments, like cutting the Baileys in half - but a little flavor was definitely sacrificed by doing so. Still....
We came in 2nd!!!! (again!) Woohoo!
Congrats to the winners. Hopefully they will pick an easier theme next time. May we suggest citrus? Cookies? Banana? Anyway, we can't wait!

Irish Cream Truffle Fudge
1 1/2 cups semisweet chocolate chips
1/2 cup white chocolate chips
2 tablespoons butter
1 1/2 cups icing sugar
1/4 cup Irish cream liqueur (we used Baileys)
1/4 cup heavy cream
1/2 cup chopped nuts

1/2 cup semisweet chocolate clips
1/4 cup white chocolate chips
2 tablespoons Irish cream liqueur
1 tablespoon butter
  • Line an 8x8 inch pan with tin foil. Use butter to grease the foil.
  • Melt the 1 1/2 cups semisweet chocolate chips, 1/2 cup white chocolate chips, and butter until soft enough to stir. You can do this over a double boiler or on low heat in the microwave.
  • Stir in the icing sugar and cream until smooth. Stir in nuts. Place in pan and smooth top down. Note: it might be a nice touch to add the white chocolate chips with the nuts, instead of melting them at the beginning - it could up the prettiness factor if they don't melt.
  • Melt remaining chocolate. Using a fork, beat in butter and cream. Spread over the cooled fudge with a knife. Use hands to smooth the top, if necessary.
  • Refrigerate until firm - a few hours at least.
Love the combo of chocolate chips!
Sprinkle in the icing sugar.
Ready for the party...
See the nuts in the batter?
We used chopped walnuts.
Mixing the topping together.
We used some extra white chocolate chips to decorate.
We thought they'd look like dominoes...
but most people at work thought they were eyes!
Ready for judging!

March 17, 2010

Chocolate Cheesecake Tartlets


Happy Sweet Sixteen Lisa!!!!!

The season of birthdays drew to a close as we celebrated Lisa's super sweet sixteen! This monumental birthday had to be rung in with something sweet, of course. Lisa's pick: Chocolate Cheesecake Tartlets, out of the Better Homes & Gardens "The Ultimate Cookie Book" (we made a few adjustments). These bite-sized tarts held just the right enough of sweetness to match Lisa's super sweetness.

We were a little pressed for time, so we resorted to buying mini tarts from the grocery store. We recommend that you also just buy them. It would be kind of fun to make the pastry, but dealing with such tiny tart cups would probably be a little tricky... we won't spill your secret!
If you use the pre-made pastry, these are actually a really easy treat to whip up in short order.

Chocolate Cheesecake Tartlets
Cheat and use packaged mini-tarts --> 2 packages of 18, for a total of 36 tartlets
1 package (8 oz) cream cheese (equivalent to 1 cup), softened
3 oz bittersweet chocolate (1/2 cup chocolate chips), melted and cooled
1/2 cup sugar
2 egg yolks
4 tablespoons milk
1 tablespoons vanilla
Whipped cream
Chocolate shavings
  • In a medium mixing bowl, beat cream cheese and chocolate together until combined. Note: we used semi-sweet chocolate chips instead of bittersweet chocolate. Things worked out. Beat in sugar, egg yolks, milk, and vanilla.
  • Spoon a rounded teaspoon of the filling into (uncooked) tarts. Arrange tarts on baking sheets.
  • Bake 18 minutes or until crusts are golden and filling is set. Let stand for 10 minutes before removing tarts from pan. Transfer to a wire rack and let cool. The puffy centers will deflate a little.
  • A few minutes before serving, top each tart with whipped cream and sprinkle with chocolate shavings.
The birthday girl!
Batter on the beaters.
Tarts spread out on the baking sheets.
The chocolate centers deflate when they cool.
Don't worry, any cracks will be covered up by the whipped cream.
Pretty!

February 23, 2010

Raspberry Cheesecake Brownies


Lisa's swim team is AMAZING!!! Shout-out to the top synchro team in the province!

Our resident swimmer is also obviously a baker extraordinaire and had made these brownies once before. At the request of a teammate celebrating her sweet sixteen, Lisa decided to make them again. Except a stellar showing in the provincial duet competition kept her out a little late the night before the big birthday. Amy jumped in and started things off. Team effort!

Raspberry Cheesecake Brownies
This recipe (slightly modified) came from one of our new favorite cookbooks: "The Ultimate Cookie Book" from the Better Homes and Gardens series.

1 cup chocolate chips --> original recipe called for a mix of unsweetened and semisweet... we used all semisweet
1/2 cup butter or margarine
1 1/4 cup sugar
4 eggs
2 1/2 teaspoons vanilla
1/2 teaspoon salt
3/4 cup all-purpose flour
1 package (8 oz = 250 g) cream cheese
2/3 cup sugar
2 teaspoons lemon juice
2 tablespoons all-purpose flour
1 1/2 cups raspberries --> frozen worked for us, but fresh is probably better
1 tablespoon sugar
  • In small pot, melt together chocolate and butter over low heat. Stir gently, until smooth. Remove from heat and let cool (we're a little impatient and stuck the pot in the freezer to speed things up).
  • Whisk 1 1/4 cups sugar and 3 of the 4 eggs (one at a time) into the melted chocolate. Stir in 2 teaspoons vanilla and salt, then add flour and stir until just combined.
  • Grease and flour 13 x 9 inch baking pan. Spread chocolate batter into pan and set aside.
  • In medium bowl, mix together cream cheese and 3/4 cup sugar (it helps to soften the cream cheese... let it warm up a bit). Beat in lemon juice, the last egg, and a 1/2 teaspoon of vanilla. Beat in the flour.
  • Scoop cheesecake batter into pan, spreading evenly over the chocolate layer. Top with raspberries. Sprinkle with sugar.
  • Bake for 35 minutes in a pre-heated over at 350 F. Remove from oven when top is puffed and edges start to turn golden brown. Cool in pan. Cover and chill for 6 hours. Cut into bars.
  • Store in refrigerator.
Check out that chocolate!
Make sure the greased pan is coated in flour...
You want to be able to remove the brownies from the pan!
The layers come together...
A field of frozen raspberries.
Enjoy!

January 16, 2010

Frozen Chocolate Mint Mousse

This one was all Lisa, and it was divine!
We've been pouring though cookbooks (3 new ones were added to the cupboard over Christmas) - but this recipe came from a book that's been on the shelf for years: Mrs Fields Best Cookie Book Ever!

A creamy concoction that's somewhere between a light ice cream and a pudding, the Frozen Chocolate Mint Mousse makes an elegant dessert. Really, this would be awesome for company... but our family was quite content to enjoy it on our own on a quiet Sunday night!

8 oz semisweet chocolate
2 large egg whites
2 pinches cream of tartar
1/2 cup white sugar
1/4 cup water
1 cup heavy cream (whipping cream), chilled
2 teaspoons peppermint extract
1/2 cup semisweet chocolate chips
  • Chop up the chocolate, and then melt it. You can use a double boiler (google this... it's basically a pot over a pot of hot water), or microwave on low. Set aside to cool slightly.
  • While the chocolate is in the microwave (use the microwave... it's much easier!), beat the egg whites and one pinch of cream of tartar together until stiff peaks form.
  • In a small pot, boil the sugar and water with the 2nd pinch of cream of tartar. Boil for 10-12 minutes, until it reaches 234 - 240 F (if you don't have a candy thermometer, you'll know it's time when it reaches a "soft-ball stage").
  • While mixing, pour the hot sugar syrup into the egg whites to make a stiff meringue. Fold the melted chocolate into the meringue to make chewy lumps.
  • Coarsely chop the chocolate chips.
  • In a medium bowl, beat the heavy cream until soft peaks form. Keep mixing! Add the peppermint extract. Mix a little longer! Fold the chocolate chips into the cream.
  • Fold the whipped cream into the chocolate meringue. Leave a few streaks of whipped cream (i.e. don't go too crazy blending them).
  • Spoon the mousse into serving dishes. Cover with plastic wrap and freeze for about 2 hours, or until firm.
  • Remove from freezer about 5 minutes before serving. Makes 4 - 6 servings.
* Note: the original recipe calls for 3 tablespoons creme de menthe instead of the peppermint extract. We just didn't have any on hand, unfortunately!

Beating the egg whites
Picture perfect in a parfait glass?
Wait! A little syrup for the finishing touch!